Wednesday, February 29, 2012

Cooking with Cricut Challenge # 75: Carnival Birthday

Hello and welcome to another Cooking with Cricut challenge! This week our theme is Carnival Birthday. So many fun things you can do with this, and you should definitely check out what the rest of the design team came up with- some amazing creations to inspire you this week! I debating doing a birthday card, but ultimately decided to go with a layout (I know, BIG surprise! lol) ;) I just had an inspiration for how fun it would be to make a little boy's (in this case my nephew) birthday page with all the animals you would see at a carnival or circus. So I broke out my Create a Critter and put it to work!!
All the animals and accessories, including the tent are from Create a Critter.
I added some balloons and party hats to incorporate the 'birthday' theme
I used an American Crafts Galaxy marker in white to add the highlights to the balloons.
I used some 'thickers' for the first part of the title, and Simply Sweet for the second half. Usually I reserve that font for 'girlie' pages, but it works for a little boy page too!
This page was very time consuming, but so much fun. I can't wait to see what you all come up with for this fun and unique theme, please come join us!! On a related note, this is the last week for our current design team term, but we have a new batch of talented and creative ladies to inspire you starting next week. Make sure you stop by to meet all the new faces! :)

Supply list:
Cardstock: Colorbok, DCWV, Coredinations
Patterned Paper: Paper Fever, Reminisce
Cartridges: Create a Critter, Simply Sweet
Letter Stickers: Thickers by American Crafts
Marker: Galaxy Marker by American Crafts

Whimsical Designs Challenge: Getting Sketchy

Hi everybody and welcome to another challenge at Whimsical Designs! This week the uber talented Nanne has shared one of her amazing sketches with us for inspiration:
For those familiar with my blog you will not be surprised that I turned the sketch into a layout ;). I had this awesome photo of my hubby, and wanted to make a more masculine layout:

I used kraft paper to make the banner flags, and inked them up with Tim Holtz distress ink, and added silver brads. I like the look and think they work with a masculine page.

I also love stars for boy pages (I'm sure I'm not alone in this) and my husband loves stars, so I always like to add stars to his pages :)


I used Stephanie's fun star stamp from her Whimsical Fun Vol 1 set to make this fun border. I love how versatile these stamps are- that is really what I look for in a stamp- I can go from boy to girl, from layout to card and cover any occasion I might need and these stamps fit the bill better than any others I have used. If you would like a set of your own, just go HERE :)
Here is a picture of the stamp set I used, and all the other fun sentiments it includes:
I hope you enjoyed my project, and I can't wait to see how you all utilize the sketch this week!

Supply List:
Cardstock - Colorbok
Kraft - Oriental Trading Co.
Patterned Paper - Basic Grey, Scrap Within Reach, Imagine 'Better Together' print
Cartridges - Opposites Attract (title), George (star)
Star stamp- Whimsical Designs Whimsical Fun Vol 1 set
Brads - stash
Ink: Tim Holtz

Tuesday, February 28, 2012

2012 Scrapbook Trend #8: Numbers

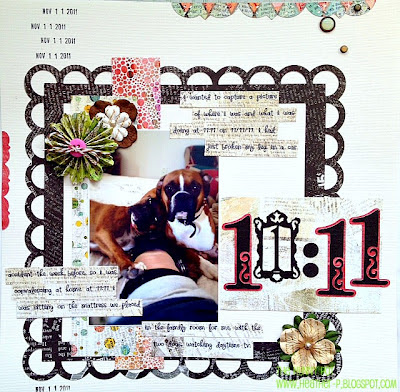
Welcome back to another 2012 Scrapbook Trend project. This time our trend is Numbers. When I decided to do these projects and saw the numbers trend I already knew what I wanted to do. I had taken a picture of what I was doing at 11:11 on 11/11/11. I thought it would be fun to make a layout highlighting this random moment in my life on a very unusual date and time. In my case, I had been in a fairly bad car accident the week before and broke my leg. At 11:11 on 11/11/11 I was convalescing at home with my two critters. I really love this photo because those guys really were right by my side throughout the whole healing process. Here is my layout:
I printed out my journaling on patterned paper and cut it in strips. I used the Sophisticated cart for the title. I really love the pretty flourishes and the framed monograms as well.
I purchased this date stamp (part of the Smash collection) and I love love love it! I will be using this one A LOT.
I won this Pink by Design script background stamp in a blog hop, and the one thing I was excited to do with it was stamp on flowers, lol! I added some liquid pearls to the flower centers (another new favorite!!)
Broke out the Ribbons and Rosettes cart again. It is fun to experiment with the different edges and looks you can get with all the different cuts.
I hope you enjoyed my project, and will be inspired to use some numbers on your project! Stay tuned for the next trend (next to last!!) which is Decorative Tape! LOVE this one!

Supply List:
Cardstock: Colorbok
Patterned Paper: Basic Grey (Out of Print)
Cartridges: Elegant Edges (borders, scalloped mat), Sophisticated (title) Ribbons and Rosettes (Rosette)
Brads: Basic Grey
Flowers: Prima
Liquid Pearls: Ranger
Bakers twine: My Craft Spot
Buttons: Button Bonanza
Stamp: Smash

I am entering the following challenges:

Party Time Tuesdays - Anything Goes

Monday, February 27, 2012

2012 Scrapbook Trend #7: Honeycomb Shapes

Hello and welcome to the latest installment of the 2012 Scrapbook Trends. I was really looking forward to this one, which is honeycomb shapes. I have been seeing this all over the place, and I really love this look. There are several carts that include a honeycomb (or hexagon) shape- I used Winter Woodland- and it is a great way to use your scraps, or just play around with different embellishments. Really fun! For my layout I actually printed and cut all my honeycomb shapes with my Imagine. It has been very neglected, so I decided to break it out. I loved how I could cut the shape and then print it with all the different coordinating patterns. All the paper was printed with the Imagine More Cards, and the title and flourish were cut with Yummy. Here is my layout:

I was so excited to discover that I have this notebook paper print. I tend to forget what I have sometimes, lol, But I have a feeling this print is going to be getting a workout now!
Here is a closeup of some of the honeycomb shapes. It was really fun assembling it, kindof like putting a puzzle together, and so many different ways to go with it!
I added some buttons and brads for interest.
I cut the title from Printing Press (I love the mixed fonts!) and printed it with a pattern from Yummy. The pattern was actually a much darker brown than what it printed. Disappointing, but I still used it :)
The flourish is also cut from the Yummy cart. I popped it up on pop-up glue dots for some depth. This is just a personal preference, but I really like the look of the prints on non-textured paper better. I didn't have any 12x12 non textured paper, so I printed it on the 'back' or less textured side and it was just fine.

I hope you enjoyed my project, and have been inspired to try some honeycomb shapes (if you haven't already!). Stay tuned for trend # 8: Numbers!!

Supply List:
Cardstock: Colorbok
Patterned Paper: Imagine More Cards, Imagine Yummy
Cartridges: Winter Woodland (hexagon), Printing Press (title)
Brads: Eyelet Outlet, Fancy Pants
Buttons: Button Bonanza
Floss: DMC

I am entering in the following challenges:
Frosted Designs - Geometric shape used 3 times (I used 3 rectangles, and more hexagons :)
Go Fish - Creative use of typeset
Sunday, February 26, 2012

Pile It On Challenge # 09 - Make it a Fun Fold

Welcome to another challenge at Pile it On! This week we are making cards with a fun or 'fancy' fold (think gate folds, easel cards, step cards, etc.). This week our sponsor is Simon Says Stamp! I made a gate fold card with this adorable digi from A Day for Daisies:
Here it is upright, so you can better see how it opens:
The sentiment is from Whimsical Designs 'Whimsical Fun Vol. 1' set. I used Elegant Edges to cut out the Stamp-shaped mat for the Sentiment stamp, and inked the edges with chalk ink. Then I added some liquid pearls for a little extra somethin'. I think I am addicted to this stuff, lol!
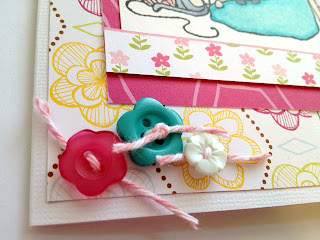
I found these adorable flower shaped buttons in my stash, and added some bakers twine.
I hope you like my project! Please come and join us with your fancy folded creations, I can't wait to see all the inspirational things you come up with!

Supply List:
Cardstock: Colorbok
Patterned Paper: American Crafts, Pebbles
Stamps: A Day for Daisies (digital image) colored with Copics, Whimsical Designs (Sentiment)
Bakers Twine: My Craft Spot
Liquid Pearls: Ranger
Ribbon: American Crafts
Cartridge: Elegant Edges

I am entering my card in the following challenges:

Fantabulous Cricut - Ribbons and Lace
Die Cutting Divas - Favorite Pet (kitties!)
Celebrate the Occasion - Thinking of You
Crafts and Me - Shades of Spring
For Fun Challenges - 3 buttons, 2 ribbons (I used ribbon and twine), 3 buttons (or brads)
Little Darlings - Pearls
My Mum's Craft Shop - Buttons and Ribbons
A Day for Daisies - Color Challenge
Poodles Parlour - Mother's Day or a card for a girl
Crafty Catz - Something beginning with a "B" (Blue, Ball of yarn, Buttons)

Thursday, February 23, 2012

Liebster Blog Award!!!

Wow!! I was truly honored and humbled today to have received the Liebster Blog Award from the talented Kristen of The Simple Things! Thank you so much Kristin!!
This really just caps off an amazing day- it feels really great to know that someone is ACTUALLY reading my blog, finding some inspiration here, and appreciating what I do! The origins of the Liebster Blog Award are unclear…but as Melissa shared, “the word translates from German as “darling” or “beloved”. It’s given to bloggers who have less than 200 followers in order to generate some traffic for them.” Cool! Here are the guidelines for the Liebster Blog Award:


The rules of the Liebster Blog Award are:
1. Acknowledge the blogger who gave the award by linking back to them.
2. Give this award to five other bloggers (who have fewer than 200 readers), and let them know through a comment on their blog.
3. Post the award on your blog.
4. Best of all – bask in the glory, have fun and share the love!

Here are the 5 blogs I am passing on this award to:

1. Jaihart Just Lovely Designs - Jill is a super talented artist with some truly beautiful creations and tutorials. Check out her 'Sundays are Lovely' linky parties!
2. One Day at a Time - I discovered Sara's blog when she became a designer for the Paper Variety. I love love love her layout style, really inspires me. And she has a boxer like me! :)
3. Tangle's Treasures - This gal is relatively new to blogging  (I think), but SO talented. her cards are amazing!
4. Brown Paper Crafts- Ali is also an amazing scrapbook designer, I love her work, and her blog!!
5. Nita's Notes- Nita is also an innovative and creative crafter, she does beautiful work that is clean and fun.

Congratulations ladies! Can't wait to see who you choose to spread the love to! :)

4 Crafty Chicks # 78 Inspiration Picture

Happy Thursday crafty friends! Sadly today is my last day as guest designer for 4 Crafty Chicks. Fortunately I will be back in April! This week we had a beautiful picture to draw inspiration from:
I had a great time with this challenge, inspiration photos are always fun. I wanted to do a layout, here it is:
I immediately thought of the Sophisticated cart for this project. It has very elegant images. Every cut on this layout is from Sophisticated, including the title.
I considered adding some gems to the chandelier, but ultimately decided to go with some liquid pearls to jazz it up. I think both are equally elegant.
I did add some gems to the flower centers, though! I used the chandelier and chair cuts since the inspiration picture was in an elegant room. I didn't think I would ever use this cut, so I love when inspiration just strikes and you find a way to stretch and utilize the tools you have in new and unique ways.
So there's my project! I want to thank the 4 Crafty Chicks: Lori, Leanne, Tamie and Melissa for having me. It's been great creating with these talented ladies!  I really hope you will head over to 4 Crafty Chicks and show us your take on that inspirational photo. Until April! :)

Supply List:
All Paper: DCWV
Cartridge: Sophisticated
Flowers: Prima
Liquid Pearls: Ranger

Wednesday, February 22, 2012

Whimsical Designs Design Team Post

Hi everyone, and welcome to my FIRST post for Whimsical Designs!! This week our project theme is "Time Flies" so your project should have a clock or wings!
I chose wings, with this cute image from Tiddly Inks. The Whimsical Designs sentiment went so perfectly with the image. I cut a strip of vellum, and stamped, and then heat embossed the sentiment on the vellum, so some of the colors in the back would show through. This sentiment is from the Everyday Sentiments line.

Here is a close up of the image from Tiddly Inks. I added some diamond stickles to the wings to emphasize them. I cut out the circles with Spellbinders dies.
I tied a bow and secured with a brad:
Here is the stamp set. I think this one is my favorite because it has so many sentiments for everyday occasions, and can be adapted for almost any type of project, you can purchase your own set HERE.
Please come join us with your Time Flies projects, can't wait to see what you all come up with!
Supply List:
Cardstock: Colorbok
Patterned Paper, embossing powder, ribbon: American Crafts
Brad: Basic Grey
Stamps: Sentiment (Whimsical Designs Everyday Sentiments), Image (Tiddly Inks Wryn series, colored with copics)
Dies: Spellbinders Nestabilities

I am also entering this card in the Tiddly Inks Sparkle it Up! Challenge

Tuesday, February 21, 2012

2012 Scrapbook Trend #6: Doilies

Hi crafty friends! Welcome to Scrapbook Trend #6: Doilies. I don't know about you, but I have been seeing this trend ALL over! I was anxious to give it a try. I got this doily from Amazon- and in case you can't see in the photo the background paper has doilies as well. There are also doily punches, stamps and Cricut cuts, so tons of ways to use this pretty trend. I created a layout about a weekend trip to Vegas with my hubby. The layout design is from the current challenge at Once Upon a Sketch:
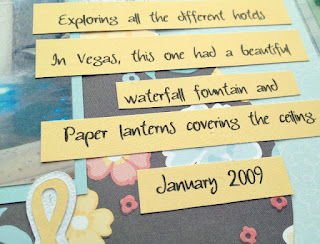
We were exploring the different hotels, and in this one (sorry, I don't remember which one!) their lobby had a beautiful waterfall fountain with paper lanterns strung up on the ceiling. Even though I didn't include that photo, I wanted to preserve the memory by including some paper lanterns on my layout. I used the Pagoda cartridge- one of those carts that I LOVED but had never had the opportunity to really use. I know we all have one of those, right! So I was excited to finally have a chance to use it!
I continued the Asian style theme with the koi fish and the kanji word, which means'journey'. I used another new cartridge- Type Candy- for the title.
After placing the koi I felt like it was a little plain, so I added some liquid pearls. It gave it a little something extra.
I typed the journaling on the computer and cut it in strips

Supply List:
All Paper: American crafts
Cartridges: Pagoda, Type Candy
Liquid Pearls by Ranger

Challenges Entered:
Once Upon a Sketch- Sketch plus journaling about a vacation or holiday

Monday, February 20, 2012

2012 Scrapbook Trend #5: Chalkboard

Hi everybody! It's been a while since I posted one of my 2012 Scrapbook Trend projects. I kinda got stuck on this one, which is chalkboard. I was actually really excited to try it out, but then had a really hard time finding a way to fit it into a layout. I think this trend would be perfect for a back to school project, or labeling. Lots of fun uses for the new chalkboard paper. I wanted to show how it could be used in a layout, and that is where I got held up. Either way, I incorporated it into this layout of a photo taken at a surprise party we held for my mom's 60th birthday. She's a teacher, so the chalkboard did fit...kindof, lol! Here is the project:
I used this week's sketch over at SOUS for the layout design. The actual chalkboard paper is from DCWV- they actually have a whole line of chalkboard paper pads, so if you want to give it a shot I would recommend them. They have different size stacks, as well as different colors, and the paper was not too heavy- I easily cut out this blurb shape from Plantin Schoolbook with my Cricut. I tried writing on the chalkboard with an actual piece of chalk, and it worked fine, I just didn't like my handwriting with the chalk. So I rubbed the chalk dust onto the paper (so you could see it was a 'chalkboard') and then wrote the actual text with a white galaxy pen from American Crafts. It still looks like chalk, right?
I cut the rosettes from the Ribbons and Rosettes cartridge. I got this cart for Christmas, but have been sitting on it. I finally pulled it out a few projects ago and have used it 3 times since! I have been loving it! For the middles I cut balloons from Create a Critter. I used my Zig glue pen to adhere some trendy twine for the balloon string, and tied a bow.
I cut one more balloon to add next to the title. I wanted to make it clear that this was a birthday page, even though it might look like just a family photo :)
Make sure and stop by tomorrow for 2012 Scrapbook Trend #6- Doilies!

Supply List:
Cardstock: Colorbok
Patterned Paper: Pebbles
Chalkboard Paper: DCWV
Cartridges used: Simply Sweet (title) Ribbons and Rosettes (Rosettes) Create a Critter (Balloons) Plantin Schoolbook (blurb)
Bakers Twine: My Craft Spot
Brads: Basic Grey

Challenge Entered:
Stuck on you Sketches - Sketch

Saturday, February 18, 2012

For Grandpa

I wanted to share a very special layout with you today. I lost my Grandpa recently. He was a highly decorated World War II veteran, and while at his memorial service while looking at all his amazing old war photos I knew that I wanted to do some layouts to commemorate him. This is the first one. This is also the first layout I did with my BRAND NEW gypsy! That is still a work in progress :) Here is my layout:
I actually got a bit emotional while putting this all together, which was a really strong reminder of why I love this hobby so much and why it is so much more than just a 'hobby'. It's a beautiful thing to be able to make a visual tribute of someone you love to remember them. Now to the fun stuff! I started with a piece of kraft paper and misted some navy smooch spray. I debated using some vintage style patterned paper, but when I saw this 4th of July paper from Bo Bunny's Liberty collection I loved how the distressing fit with my military theme. I distressed all the papers a little more with a nail file and Vintage Photo distress ink. All the cuts except the title are from Stand and Salute. I made a banner of medals to represent all of the medals he had been awarded.
I used some small letter stickers from Bo Bunny's Etc. kit to spell out his rank and some of his medals.
I tore the paper back in a couple places and secured one end with an eyelet.
There's my layout- I hope you like it, and can see how proud I am to be the granddaughter of such an impressive man!

Supply List
Kraft Paper: Oriental Trading Co.
Patterned Paper: Bo Bunny (Liberty)
Letter Stickers: Bo Bunny (Etc.)
Cartridges used: Doodletype (title), Stand and Salute
Eyelets: Eyelet Outlet
Border Punch: American Crafts
Ink: Tim Holtz Distress Inks (Vintage Photo)

I am entering this in the following challenges:
Frosted Designs - brads or eyelets
Friday Mash-up - Shabby Chic or Vintage
Shopping our stash - metal
Crafts and Me Challenges - Distressed
Crafty Catz - Favorite Things (Mine are: spray ink, die cuts, vintage style, distressing)

Thursday, February 16, 2012

Patches of Pink Design Team Member!!

For 4 Crafty Chicks Guest Designer post please click HERE (or see below :)

Hello again! I have another exciting announcement to make- I have been chosen to be a design team member for Patches of Pink! If you are not familiar with this blog then you must check it out- Jalisa is uber talented, as are all the design team members, so really great inspiration as well as fun linky parties and challenges! Our theme for this week is Valentine's, so please come link up your awesome Valentine's projects with us!
For my project I am showing a Valentine's Box I made for work. They decided to have a team building activity where everyone would bring in homemade Valentine's boxes (like we did in Elementary School!) and pass out Valentine's to each other, it was fun to take that trip down memory lane :) This box was surprisingly hard to photograph, so please forgive the photos:
 Almost all the cuts were made with Love Struck 2010, except for the rosettes that were cut with Ribbons and Rosettes. 
 I added some glossy accents to the rose to give it a little glisten.
 I accented a few of the hearts with some diamond stickles and added some bakers twine to a clear button.
 All the paper is from Echo Park Yours Truly.
I hope you enjoyed my 'old school' Valentine's Box. Please head over to Patches of Pink to check out what the rest of our amazingly talented design team has created, and be sure to link up with our linky party!!