Showing posts with label Winter. Show all posts

Saturday, April 19, 2014

All Bundled Up for True Xoxo Scrapbooking

Hi all! I was honored to be selected as a guest Designer over at True XoXo Scrapbooking this month. If you haven't checked out this blog, you definitely should. Every month they have a new challenge that involves scraplifting the work of a Design Team member. I think this is a really fun idea because for one, it is different than the usual sketch or theme challenges. For two, there are so many ways you can scraplift someone's work- you can take their project and use it as a sketch, or get inspired from a design element or color scheme. Or even just go off the subject matter of the original layout. There are so many possibilities and it is such a unique way to get inspired. Here is my layout: (Sorry again for the weird shadows and color casts on the photos, I'm going to have to work on that!)
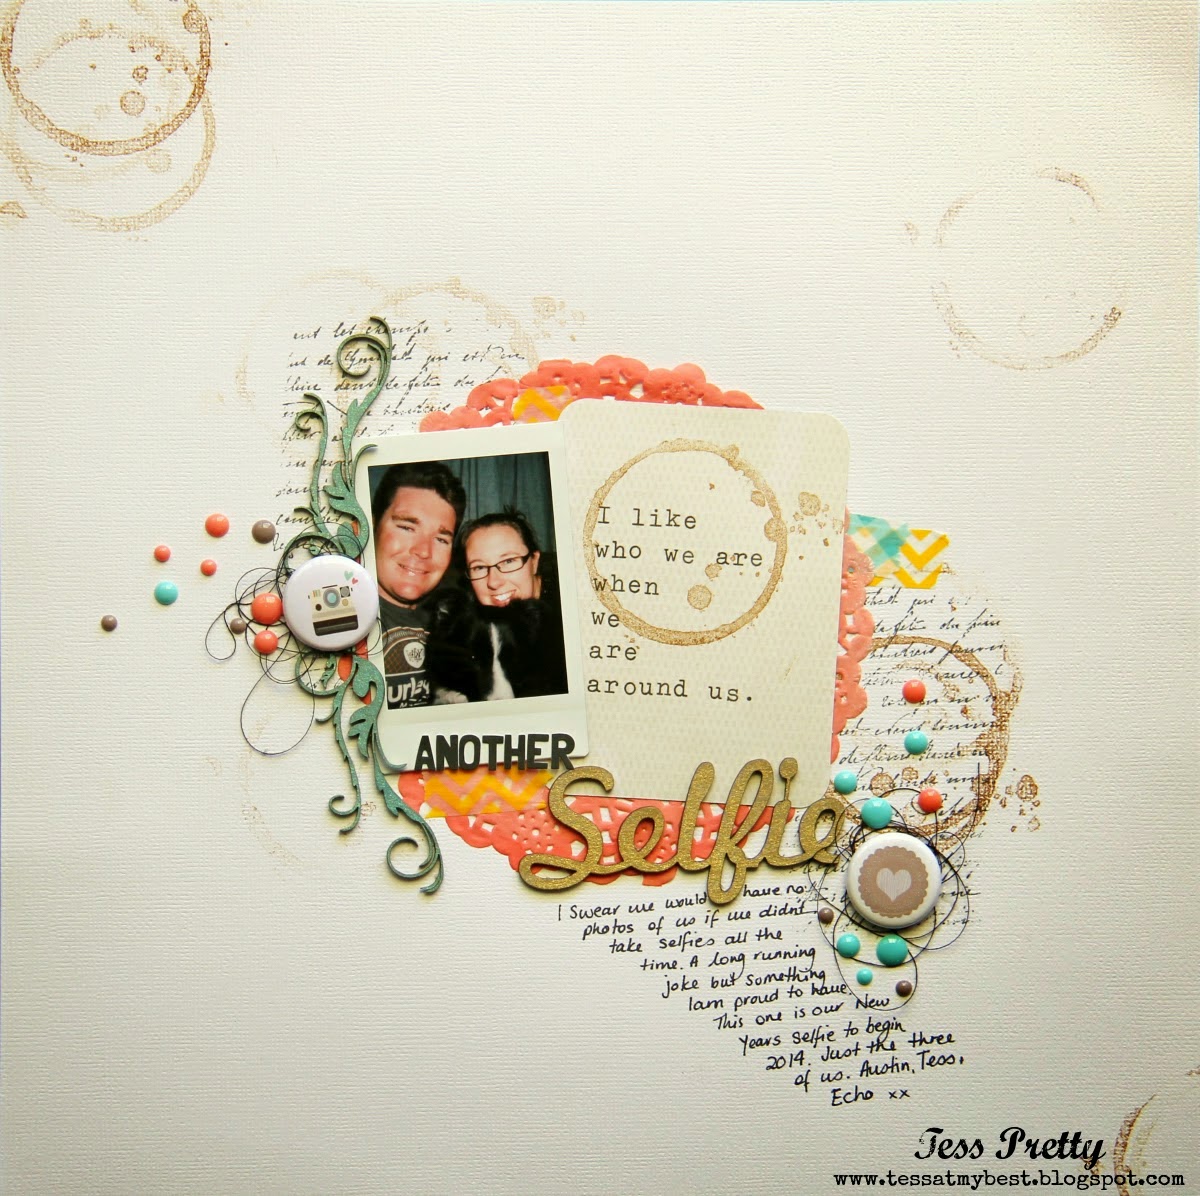
And here is the page from the talented Tess that I scraplifted:
I really love her layout and used many elements for inspiration. For one, the basic design. I used her page as a sketch, and just upsized it a bit. I journaled directly on my background paper as she did. I tried to place some of my elements where she had her coffee ring inking and I also used some enamel elements as embellishments like she did with the enamel dots.
I usually have rather large titles on my pages, so I thought it would be fun to downsize it for a change, using the letter stickers that came in the paper pack I was using- Keepin' Cozy by Echo Park. Those itsy bitsy tiny little minuscule pearl elements are from Doodlebug and I just love them. They are so tiny and cute!! The enamel arrows are from them as well.
I layered some cute washi in the upper left corner with some snowflake stickers from the kit. I also used a snowflake shape as a background element (where Tess used a cute doily) as my page had to do with bundling up from the cold.
Here I used a snowflake border (where Tess used a pretty flourish) to frame my photo and then added a cute little Nordic deer sticker.

I had a lot of fun with this challenge, and it looks like I will be joining them next month as well! They have a really talented design team and I am always inspired by their work, so I hope you will stop by and give it a try! It's a fun way to get those creative juices flowing, AND you could be picked to be a guest designer for them!!


Tuesday, January 1, 2013

Ring in the New Year Blog Hop!!

Hello and welcome to the Ring in the New Year Blog Hop! If you have just stumbled upon my blog you can follow along with our hop by starting at Ribbon's and Glue. If you have been following along you should have come from Missy from Quick Chick Designs.
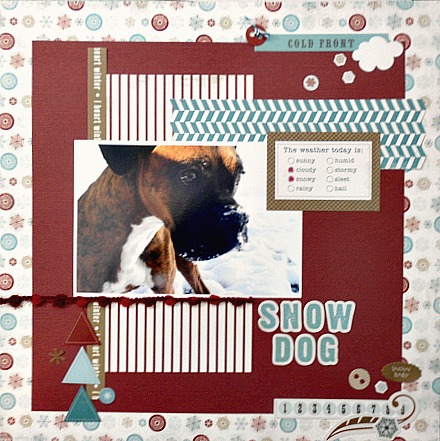
The theme of this blog hop is to use something "new". I am sure many of you got some new crafty goodies over the holidays? I actually got less than usual this year since I decided I needed to start using up some of my stash (and my space keeps getting smaller and smaller... funny how that happens!) I did however get a few new things- one of which was Carta Bella's new Winter Fun collection. I don't have a TON of winter themed paper, so I decided to add some to my stash (and contribute to my space problem). So, I decided to grab some of that fun new paper and make a layout.
 
 
 We had a nice snowstorm a few weeks ago so I thought it would be fun to get some shots of my doggie playing in the snow. Well... easier said than done, lol! She was less than cooperative, but I did manage to get one or two useable shots. So I built my page around my favorite photo, and just used the stickers, journaling spots and border strips that came with the collection. I love utilizing these little 'extras' as embellishments on my layouts- it makes the whole process SO much faster and easier and you know everything is going to coordinate just right. Here are a few closeups:


Thanks so much for following along with us today! Your next stop is the talented Lisa from A Mermaid's Crafts. In case you get lost along the way, here is the complete lineup:
 

Friday, January 13, 2012

Cooking with Cricut Blog Hop

Welcome to Day one of PaperCraftingWorld.com and CookingWithCricut.com’s first Blog Hop of 2012! Our theme is: “Something Old, Something New, Something Borrowed, Something Blue!”

If you have arrived here from the uber talented Melin at Cooking with Cricut you’re in the right place! If you’re joining us mid-hop, head on back to see Melin and start at the beginning so you don’t miss any of the wonderful projects our talented Designers have created!

Our Designers had to use something old from their craft stash, something new (a recent purchase or new technique), something borrowed (an element from a Cricut cut or from a PaperCraftingWorld.com cutting file or digi stamp) and of course, something blue.                             

This was a really fun theme, I really had to think outside the box for the 'something borrowed' portion. For my project today I created a layout:
My layout sketch was inspired by a sketch by Becky Fleck in the January Page Maps release, I thought it was really fun! All the paper is from SEI, with Bazzill cardstock. I added a pop of POW glitter paper from American Crafts. I posted about this paper HERE, it is really fun! The title is cut from Makin' the Grade- one of my favorite font cartridges.
My 'Something Old' is the paper and the cardridges.
My 'Something New' is the Fiskars notebook border punch, the POW paper, the camera used to take the photos, and the printer to print them with!
The 'Something Borrowed' is the scarf on my Create a Critter puppy. It came from the Winter Frolic cart.
The 'Something Blue' is the background paper of course!
Here is a close up of my Borrowed element, as well as the journaling that explains the photos :)

I have a little blog candy to give away! It is two scrapbook idea/inspiration books (One is a copy of the Cricut Magazine idea book- I love these books, they have so many great ideas of all the amazing things you can do with your cricut!) And a Pink by Design stamp set! All you have to do to be eligible for the prize is to become a follower my blog and leave a comment below. If you would like a second chance to win you can grab my button and post it on your blog. This is not necessary to be eligible for the prize, but if you do just leave a second comment telling me you did for a second chance to win! I will announce the winner of the blog candy on my blog on Monday January 16th.

Now head on over to see Yolie at Just Yolie, Just Create and see what she’s created!

Make sure you check in tomorrow at CookingWithCricut.com and see what the Day Two Designers have cooked up! Thanks for stopping by and hopping with us!
In case you get lost along the way, here is the full Saturday lineup:

Melin – http://www.cookingwithcricut.com
Heather – http://www.heather-p.blogspot.com You are here**
Yolie – http://www.justyolie.com Next**
Celeste – http://www.touchedbyabutterfly.com
Debbie – http://www.workinscrappinmomof4.blogspot.com
Charlotte – http://www.alittlebitofdetail.blogspot.com
Linda – http://www.lindascreativity.blogspot.com
Jill -- http://www.jaihartjustlovelydesigns.blogspot.com
Larelyn – http://www.handmadefromtheheart-designsbylarelyn
Jen – http://www.gator-4-life.blogspot.com


Monday, January 9, 2012

Winter Wood Crafts

Hello my friends, I decided to take a break from my usual papercrafting projects and work on a WOOD crafting project! ;) I like to decorate my house year-round, for every holiday, every season. I was a little short on 'winter' decor so I hit my favorite local wood craft store to stock up. I made this snowflake trio, as well as snowman and a letter set that I will post later. All the wood is cut and designed by The Wood Connection. I just did the 'decorating'. I hope you enjoy it!!

This is the 1st of 3 new decorations I have made for my home for January, I will post the others later ;)
To create the snowflakes I used acrylic paints and ribbon from Michael's. I added some blue jewelry wire to this project. It's fun to create those curley-q shapes with the wire. For the paper I used the Pow! glitter paper from American Crafts. I was only very recently introduced to this paper, and had never worked with it before. The paper curls very easily, which made it difficult when cutting out those intricate snowflakes, but boy is this paper awesome! About half the thickness of other glitter papers I've used (which I assume will make Cricut cutting easier? Stay tuned!...) and the glitter does not come off AT ALL. And it's super sparkly, probably doesn't show up too well in my photo! I will definitely be using it for future projects! Hope you enjoyed my trio, and stay tuned for a couple more wood craft project to come!

I am going to enter this project in the Really Reasonable Ribbon challenge: Ribbons and sparkle.

Sunday, January 8, 2012

You're so cool!


I found this cute stamp from Bugaboo and thought it would be fun to color them like cardinals for a winter theme. I ran the mat through the cuttlebug (an art deco embossing folder) and layered the stamp on top with some twine from My Craft spot as a frame. The sentiment stamp is from Robin's Creative Cottage Snowman's Prayer set. I Hope you like it!

I am entering this card in the Bugaboo Catch the Bug challenge: Anything goes challenge. :)

Saturday, January 7, 2012

We're all just a little bit flakey...

Hello my crafty friends! I have had a busy crafting weekend, so you might be seeing a lot of posts from me this weekend! We finally got some snow here in Utah, so I thought this snowman card was very fitting. I love this card. This digi stamp from Dilly Beans is absolutely adorable! I also just got some of the new Bo Bunny Snowfall collection papers, and I thought it would be fun to combine them!


The stamp is colored with copics. I added a border punched from my American Crafts border punch and a stamp sentiment from Robin's Creative Cottage Snowman's Prayer set. I thought it fit this motley little snow group really well! I heat embossed the sentiment, and popped it and the digi stamp up on foam dots for more dimension. All the patterned paper and stickers are from Bo Bunny and the kraft paper is from Bazzill.

I am entering my card in the following challenges:

Dilly Beans Challenge blog - Winter Wonderland
The Kraft Journal - Anything goes
My Mum's Craft Shop - something new (Bo Bunny patterned paper!)
Whimsical Designs - On the Edge (borders)
Scraptastic Club - 1 main color, 2 accent colors (Tan with Dark blue and brown)

Thursday, January 5, 2012

ScrapbookPal.Com Design Team Entry

Hello everybody! Today's post and project is doubling as an entry to be on a new design team for ScrapbookPal.com. ScrapbookPal is an awesome online scrapbook supply store. I have gotten tons of supplies from them- everything from adhesives to Copics, and I don't think I have paid full price for one thing! I would love to be on their design team!
For my project today I wanted to make a layout of a favorite picture from Christmas. I wanted to do something a little more whimsical, so I decided to use this fun paper from Bella Blvd's Christmas Wishes collection. FYI- all the supplies I used to make this layout can be found at ScrapbookPal.com! Each product will have a link in case you would like to try it yourself! Here is my layout:

I used Bazzill cardstock for the base and the shadows cuts. All the cuts were done with the Winter Folic cartridge- I just purchased this cart from ScrapbookPal right before Christmas, and I am LOVING it! (they have it at a great price, too!) ;) I popped up the tree and reindeer on some glue dots to give them more dimension. **Here's a tip- when you're working with a Cricut cut like this where there are many layers and many of those layers are very small, I use my zig glue pen for adhesive. It has a smaller chisel tip, so you can get adhesive in those smaller places, not to mention more control. I also use my Quick Stik- this tool is awesome for picking up those small pieces and the other end easily removes gems from their backing for placement on your projects. I used it to place the star shaped rhinestones on my border- easy peasy!!


I added some stickles to the tree "ornaments" and the Reindeer's Christmas Light bulbs for a little more sparkle, and done! I hope you enjoyed my project, and make sure to head over to ScrapbookPal to stock up on all those supplies!!

Wednesday, January 4, 2012

Cooking with Cricut Challenge # 67: Something New

Hi and welcome to the first Cooking with Cricut challenge of 2012. In honor of the NEW Year, our challenge this week is to incorporate something 'new' into your project- a new technique, or new supplies or tools from goodies you might have found under the Christmas Tree. I got a Cuttlebug for Christmas and was so excited to add some embossing texture to a project! I also received some new copics (a newfound passion of mine- I'm self taught, just trying to learn all the techniques)! I used my copics to color this cute Digi from Paper Crafting World (Bear Holding Hot Chocolate). Here is my card:
I used the Cuttlebug Snowflakes embossing folder, and then sanded a bit to reveal the white core of the cardstock. The patterned paper is from Echo Park Winter Park Collection. The stamp is colored with copics and I added some puff paint from my snow marker for the 'cream' and some stickles on the snowflake. Here is a closer look:
The stamp sentiment is from Robin's Creative Cottage and I used a border punch from American Crafts. I hope you enjoyed my project today, and I am so excited to see all the 'new' goodies you all are using!!

I am also entering my card in the Fantabulous Cricut challenge for this week- Hot Cocoa!!  

Tuesday, January 3, 2012

Robin's Creative Cottage Challenge: Let it Snow

Hi y'all and welcome to another challenge over at Robin's Creative Cottage! This week our theme is: Let It Snow. This week I chose to use Robin's Snowman's Prayer set as there are a lot of fun snow/winter themed sentiments that are perfect for this type of project. For this challenge I decided to do a more vintage style snowman card. Here is what I came up with:
The kraft paper is from Bazzill and the patterned paper is Bo Bunny's Gabrielle collection. I used Joys of the Season to cut the snowflakes and snowman and then inked everything with Bazill ink. I did not cut the layers on the snowman as I planned to ink/draw them in.
I added some of Robin's cute snowflake stamps that are included in the set to the inside of the card to add some interest:
I also added some stickles to parts of the snowflake to sparkle them up a bit. So that's my project for this week, I hope you enjoy it and I can't wait to see all of your snow-y projects! :)