Welcome to another design team post for Whimsical Designs! Unfortunately I just learned this will be the last week Whimsical Designs will be hosting challenges :( Many thanks to Stephanie for all the time and energy she has put into putting together fun challenges for us. I'm sad to see it go, but I hope you will join us for our last challenge. This week we are celebrating Spring! I decided to make a card:
Pin It
I love the bright fun colors on this paper from SEI. I colored the cute image with Copics and added some liquid pearls and stickles to accentuate.
The sentiment is from the Everyday Sentiments Set. I find myself using this set a LOT. I love the bright orange.
I hand cut the little banner. Here is a copy of the set I got the sentiment from:
You can get your own set HERE. Thanks for stopping by today, and I hope you will link up your beautiful spring creations- can't wait to see your inspiring projects!
I am also entering my card in the following challenges:
My Craft Spot - Scallops
Celebrate the Occasion - Celebrate Spring
Poodle's Parlour - Anything Goes
Showing posts with label Whimsical Designs. Show all posts
Wednesday, March 21, 2012
Wednesday, March 7, 2012
Whimsical Designs Challenge: Going Green
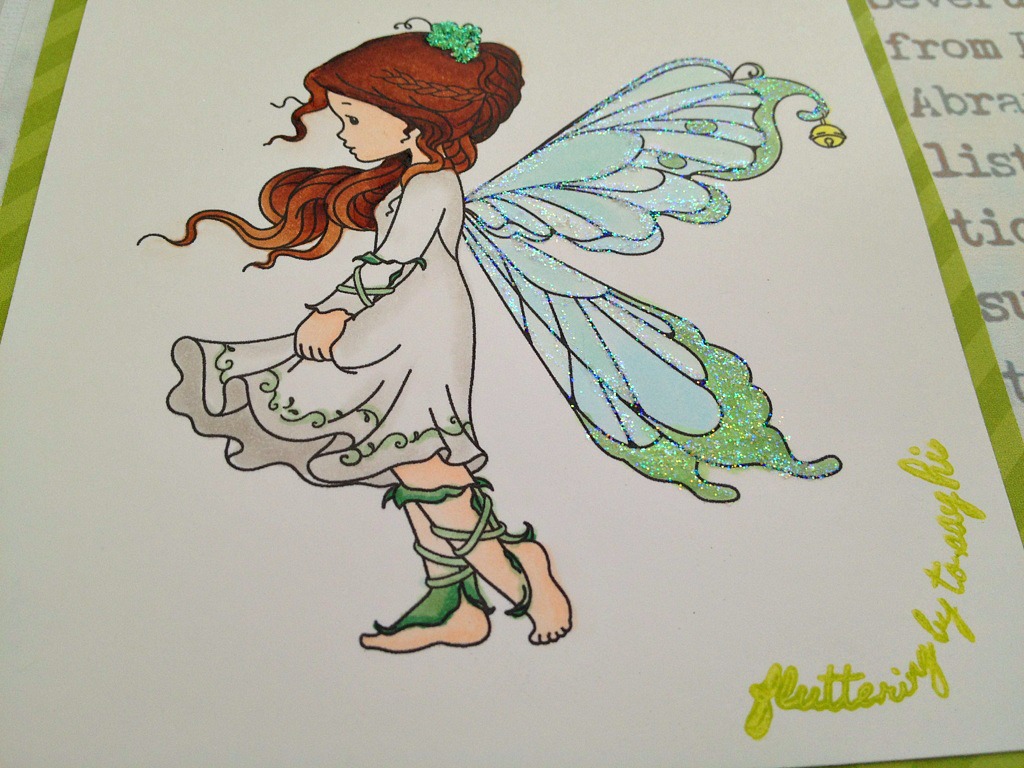
Hello and welcome to another Whimsical Designs Challenge! This week we are Going Green! For my project I decided to do a card. I wanted to make it versatile, so I could use if for any occasion, not just St. Patty's day. Here is what I came up with:
That sweet little fairy is from Wee Stamps.
The sentiment I used is from the Whimsical Fun Vol 1 Set. I had seen some fellow design team members curve their stamps, and I wanted to try it. It was super easy as the stamps are so pliable and hold the curve perfectly. And of course I had to add some stickles to glitter up those pretty wings!
The cute brad is from Basic Grey, and I used it to "tie" my bow. Hopefully you can see that there are butterflies on the ribbon- I thought it went well with the "fluttery" theme of my card. :)
The paper I used was printed on my Imagine with the Imagine More Cards Cartridge. It was leftover from another project. Here is the stamp set I used:
I used the "Fluttering by to say hi" sentiment, but you can see there are several that would have worked for this card! You can get your own set HERE! Thanks for stopping by, and I can't wait to see the green creations you come up with!!
Supply List:
Cardstock: ColorBok
Patterned Paper: SEI, Imagine More Cards cartridge
Stamps: Wee Stamps (image, colored with Copics), Whimsical Designs Whimsical Fun Vol 1 (sentiment)
Ink: Colorbox
Ribbon: American Crafts
Brad: Basic Grey
That sweet little fairy is from Wee Stamps.
The sentiment I used is from the Whimsical Fun Vol 1 Set. I had seen some fellow design team members curve their stamps, and I wanted to try it. It was super easy as the stamps are so pliable and hold the curve perfectly. And of course I had to add some stickles to glitter up those pretty wings!
The cute brad is from Basic Grey, and I used it to "tie" my bow. Hopefully you can see that there are butterflies on the ribbon- I thought it went well with the "fluttery" theme of my card. :)
The paper I used was printed on my Imagine with the Imagine More Cards Cartridge. It was leftover from another project. Here is the stamp set I used:
I used the "Fluttering by to say hi" sentiment, but you can see there are several that would have worked for this card! You can get your own set HERE! Thanks for stopping by, and I can't wait to see the green creations you come up with!!
Supply List:
Cardstock: ColorBok
Patterned Paper: SEI, Imagine More Cards cartridge
Stamps: Wee Stamps (image, colored with Copics), Whimsical Designs Whimsical Fun Vol 1 (sentiment)
Ink: Colorbox
Ribbon: American Crafts
Brad: Basic Grey
Wednesday, February 29, 2012
Whimsical Designs Challenge: Getting Sketchy
Hi everybody and welcome to another challenge at Whimsical Designs! This week the uber talented Nanne has shared one of her amazing sketches with us for inspiration:
For those familiar with my blog you will not be surprised that I turned the sketch into a layout ;). I had this awesome photo of my hubby, and wanted to make a more masculine layout:
I used kraft paper to make the banner flags, and inked them up with Tim Holtz distress ink, and added silver brads. I like the look and think they work with a masculine page.
I also love stars for boy pages (I'm sure I'm not alone in this) and my husband loves stars, so I always like to add stars to his pages :)
I used Stephanie's fun star stamp from her Whimsical Fun Vol 1 set to make this fun border. I love how versatile these stamps are- that is really what I look for in a stamp- I can go from boy to girl, from layout to card and cover any occasion I might need and these stamps fit the bill better than any others I have used. If you would like a set of your own, just go HERE :)
Here is a picture of the stamp set I used, and all the other fun sentiments it includes:
I hope you enjoyed my project, and I can't wait to see how you all utilize the sketch this week!
Supply List:
Cardstock - Colorbok
Kraft - Oriental Trading Co.
Patterned Paper - Basic Grey, Scrap Within Reach, Imagine 'Better Together' print
Cartridges - Opposites Attract (title), George (star)
Star stamp- Whimsical Designs Whimsical Fun Vol 1 set
Brads - stash
Ink: Tim Holtz
For those familiar with my blog you will not be surprised that I turned the sketch into a layout ;). I had this awesome photo of my hubby, and wanted to make a more masculine layout:
I used Stephanie's fun star stamp from her Whimsical Fun Vol 1 set to make this fun border. I love how versatile these stamps are- that is really what I look for in a stamp- I can go from boy to girl, from layout to card and cover any occasion I might need and these stamps fit the bill better than any others I have used. If you would like a set of your own, just go HERE :)
I hope you enjoyed my project, and I can't wait to see how you all utilize the sketch this week!
Supply List:
Cardstock - Colorbok
Kraft - Oriental Trading Co.
Patterned Paper - Basic Grey, Scrap Within Reach, Imagine 'Better Together' print
Cartridges - Opposites Attract (title), George (star)
Star stamp- Whimsical Designs Whimsical Fun Vol 1 set
Brads - stash
Ink: Tim Holtz
Wednesday, February 22, 2012
Whimsical Designs Design Team Post
Hi everyone, and welcome to my FIRST post for Whimsical Designs!! This week our project theme is "Time Flies" so your project should have a clock or wings!
I chose wings, with this cute image from Tiddly Inks. The Whimsical Designs sentiment went so perfectly with the image. I cut a strip of vellum, and stamped, and then heat embossed the sentiment on the vellum, so some of the colors in the back would show through. This sentiment is from the Everyday Sentiments line.
Here is a close up of the image from Tiddly Inks. I added some diamond stickles to the wings to emphasize them. I cut out the circles with Spellbinders dies.
I tied a bow and secured with a brad:
Here is the stamp set. I think this one is my favorite because it has so many sentiments for everyday occasions, and can be adapted for almost any type of project, you can purchase your own set HERE.
Please come join us with your Time Flies projects, can't wait to see what you all come up with!
Supply List:
Cardstock: Colorbok
Patterned Paper, embossing powder, ribbon: American Crafts
Brad: Basic Grey
Stamps: Sentiment (Whimsical Designs Everyday Sentiments), Image (Tiddly Inks Wryn series, colored with copics)
Dies: Spellbinders Nestabilities
I am also entering this card in the Tiddly Inks Sparkle it Up! Challenge
I chose wings, with this cute image from Tiddly Inks. The Whimsical Designs sentiment went so perfectly with the image. I cut a strip of vellum, and stamped, and then heat embossed the sentiment on the vellum, so some of the colors in the back would show through. This sentiment is from the Everyday Sentiments line.
Here is a close up of the image from Tiddly Inks. I added some diamond stickles to the wings to emphasize them. I cut out the circles with Spellbinders dies.
I tied a bow and secured with a brad:
Here is the stamp set. I think this one is my favorite because it has so many sentiments for everyday occasions, and can be adapted for almost any type of project, you can purchase your own set HERE.
Please come join us with your Time Flies projects, can't wait to see what you all come up with!
Supply List:
Cardstock: Colorbok
Patterned Paper, embossing powder, ribbon: American Crafts
Brad: Basic Grey
Stamps: Sentiment (Whimsical Designs Everyday Sentiments), Image (Tiddly Inks Wryn series, colored with copics)
Dies: Spellbinders Nestabilities
I am also entering this card in the Tiddly Inks Sparkle it Up! Challenge
Subscribe to:
Posts (Atom)